Why use groups?
- You are a teacher in a course where you have several classes and you want to filter your activities and gradebook so you only see one class at a time.
- You are a teacher sharing a course with other teachers and you want to filter your activities and gradebook so you don’t see the students from your colleagues’ classes.
- You want to allocate a particular activity, resource or topic section to just one class or set of users and you don’t want others to see it.
- You want to sort students in to S1, Y1, Guided learning or flex for messaging.
Step 01: Set up group mode
- To use groups for your entire course, you will need to setup your course for groups. This will allow you to define activities within your course.
To use groups you need first to set a group mode in Administration > Course administration > Edit settings.

Step 02: Select group mode
Group modes
There are three group modes
- No groups - There are no sub groups, everyone is part of one big community
- Separate groups - Each group can only see their own group, others are invisible.
- Visible groups - Each group works in their own group, but can also see other groups. (The other groups' work is read-only.)
For example, enabling either separate or visible groups on an assignment drop-box enables staff to filter the student submissions to see only those from a particular tutor group. With visible groups, students can see which other groups are doing the same activities as they are; with separate groups, they do not know which other groups are doing the same activities.
Using groups with discussion forums allow teachers to restrict interaction between students. Separate groups mean only students in the same group can see and participate in discussions within a particular forum. Visible groups allow students to see other group's discussions, but only participate in their own group's discussions.

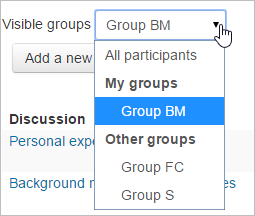
Note: Where visible groups are used or the participant can access all groups, the user's own group is shown first, followed by other groups:
Step 03: Creating a group
- Click the 'Create group' button in Administration > Course administration > Users > Groups


- Add a group name and optional description (displayed above the list of group members on the participants page), enrolment key and picture (displayed on the participants page and next to forum posts)
- Click the 'Save changes' button
- Select the group to which you want to add participants,

- then click the 'Add/remove users button

- In the "Potential members" list, select the users you want to add to the group. Multiple users may be selected using the Crtl key.
- Click the Add button to add the users to the group
An optional group ID number (an advanced setting) may be added for matching the group against external systems. Group ID numbers are not displayed anywhere on the site. Within a course, all group ID numbers must be unique. Thus it's not possible to create a group with a duplicate group ID number. We may use group numbers for Genius registration in the future.
Restricting an activity, resource or course topic to a particular group

Restricting an activity to a particular group
To be able to restrict an activity, resource or course topic to a group, Restrict access must be enabled. This will result in a 'Restrict access' section in the activity, resource or topic settings and a group restriction can then be added.

